Shopping with or without customization project, why not enjoying a saving exploring our catalog list.
Space Saving King Bed Hardware
+
Space Saving King Bed Hardware
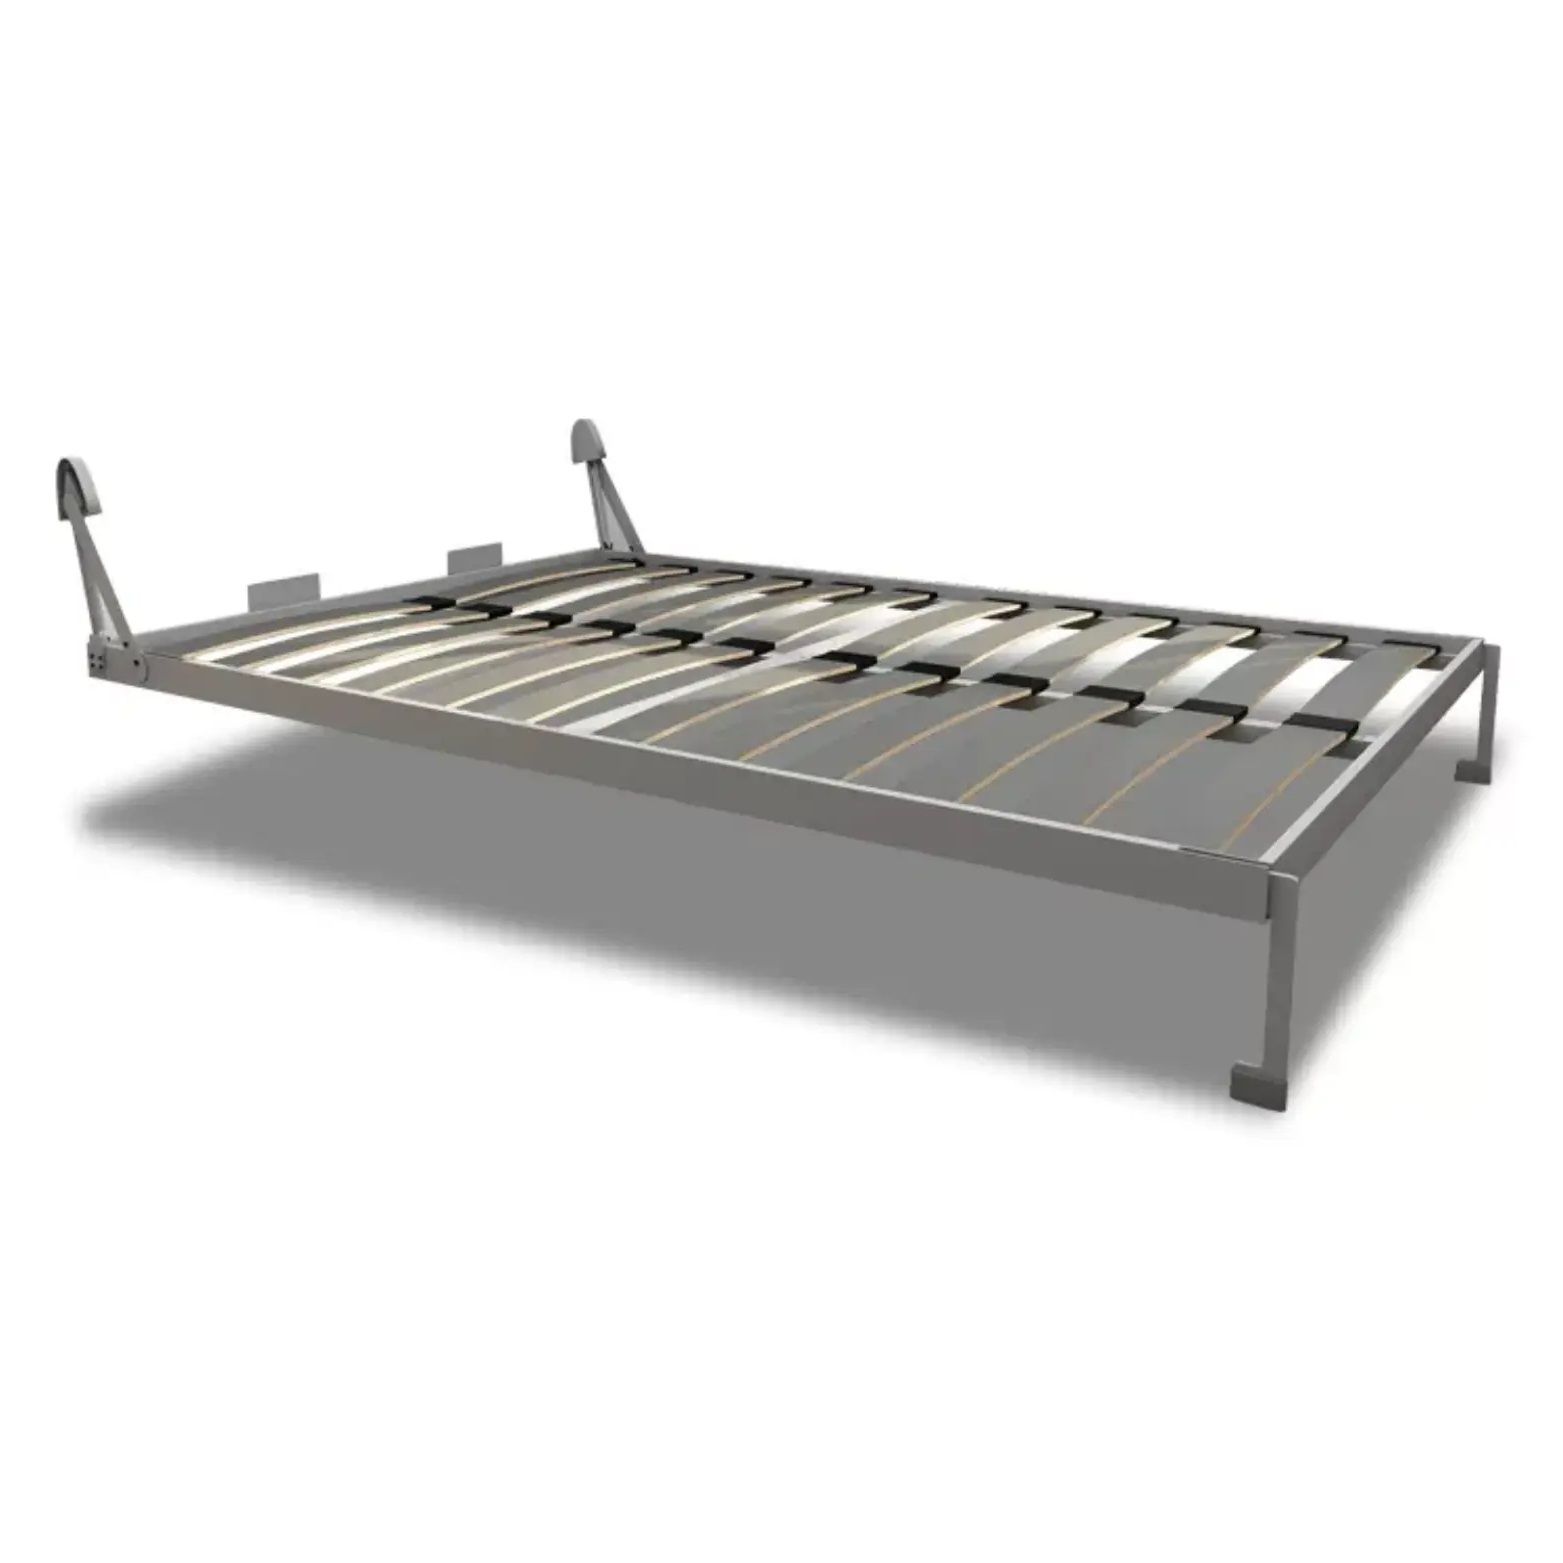
Are you in search of innovative solutions to optimize space in your bedroom? Look no further! Our company specializes in providing top-quality hardware components for Space Saving King Beds. Whether you're a furniture manufacturer or a DIY enthusiast, our range of products is designed to help you create a functional and stylish living environment without compromising on comfort. In this article, we will introduce you to the essential hardware components that make our Space-Saving King Beds the perfect choice for maximizing space in your bedroom.Mattress thickness max 250mm for standard hardware
Wall-Mounted Mechanisms: The foundation of our Space-Saving King Beds lies in our robust wall-mounted mechanisms. These sturdy components allow the bed frame to be securely attached to the wall, providing stability and freeing up valuable floor space. Our cutting-edge wall-mounting systems are engineered to support the weight of a King-sized bed, ensuring a safe and reliable solution for your bedroom.
Folding Mechanisms: At the heart of our Space-Saving King Beds are the folding mechanisms. These ingenious hardware components enable the bed frame to effortlessly fold up and down, allowing you to reclaim space when not in use. Our folding mechanisms are designed for smooth operation, and their durability ensures long-lasting performance. With adjustable tension settings, you can easily customize the folding action to suit your preferences.
Gas Springs: To enhance the ease of use and safety of our Space-Saving King Beds, we incorporate high-quality gas springs into our designs. These gas springs provide controlled assistance in the folding and unfolding of the bed frame, ensuring smooth movement without sudden drops or collapses. Our gas springs are meticulously calibrated to offer optimal support and convenience, making your bed transformation effortless.
Locking Mechanisms: Safety is our top priority, which is why our Space-Saving King Beds feature reliable locking mechanisms. These mechanisms keep the bed frame securely in place when unfolded, preventing accidental folding during use. We utilize high-quality materials and rigorous testing to ensure the strength and durability of our locking mechanisms, providing you with peace of mind.
Our Space-Saving King Bed hardware components offer an ideal solution for maximizing space in your bedroom. With our range of top-quality wall-mounted mechanisms, folding mechanisms, gas springs, and locking mechanisms, you can transform your bedroom into a versatile and efficient living space without compromising on comfort or style. Explore our selection of hardware components today and revolutionize the way you utilize space in your bedroom.
Are you in search of innovative solutions to optimize space in your bedroom? Look no further! Our company specializes in providing top-quality hardware components for Space Saving King Beds. Whether you're a furniture manufacturer or a DIY enthusiast, our range of products is designed to help you create a functional and stylish living environment without compromising on comfort. In this article, we will introduce you to the essential hardware components that make our Space-Saving King Beds the perfect choice for maximizing space in your bedroom.
Mattress thickness max 250mm for standard hardware
Wall-Mounted Mechanisms: The foundation of our Space-Saving King Beds lies in our robust wall-mounted mechanisms. These sturdy components allow the bed frame to be securely attached to the wall, providing stability and freeing up valuable floor space. Our cutting-edge wall-mounting systems are engineered to support the weight of a King-sized bed, ensuring a safe and reliable solution for your bedroom.
Folding Mechanisms: At the heart of our Space-Saving King Beds are the folding mechanisms. These ingenious hardware components enable the bed frame to effortlessly fold up and down, allowing you to reclaim space when not in use. Our folding mechanisms are designed for smooth operation, and their durability ensures long-lasting performance. With adjustable tension settings, you can easily customize the folding action to suit your preferences.
Gas Springs: To enhance the ease of use and safety of our Space-Saving King Beds, we incorporate high-quality gas springs into our designs. These gas springs provide controlled assistance in the folding and unfolding of the bed frame, ensuring smooth movement without sudden drops or collapses. Our gas springs are meticulously calibrated to offer optimal support and convenience, making your bed transformation effortless.
Locking Mechanisms: Safety is our top priority, which is why our Space-Saving King Beds feature reliable locking mechanisms. These mechanisms keep the bed frame securely in place when unfolded, preventing accidental folding during use. We utilize high-quality materials and rigorous testing to ensure the strength and durability of our locking mechanisms, providing you with peace of mind.
Our Space-Saving King Bed hardware components offer an ideal solution for maximizing space in your bedroom. With our range of top-quality wall-mounted mechanisms, folding mechanisms, gas springs, and locking mechanisms, you can transform your bedroom into a versatile and efficient living space without compromising on comfort or style. Explore our selection of hardware components today and revolutionize the way you utilize space in your bedroom.
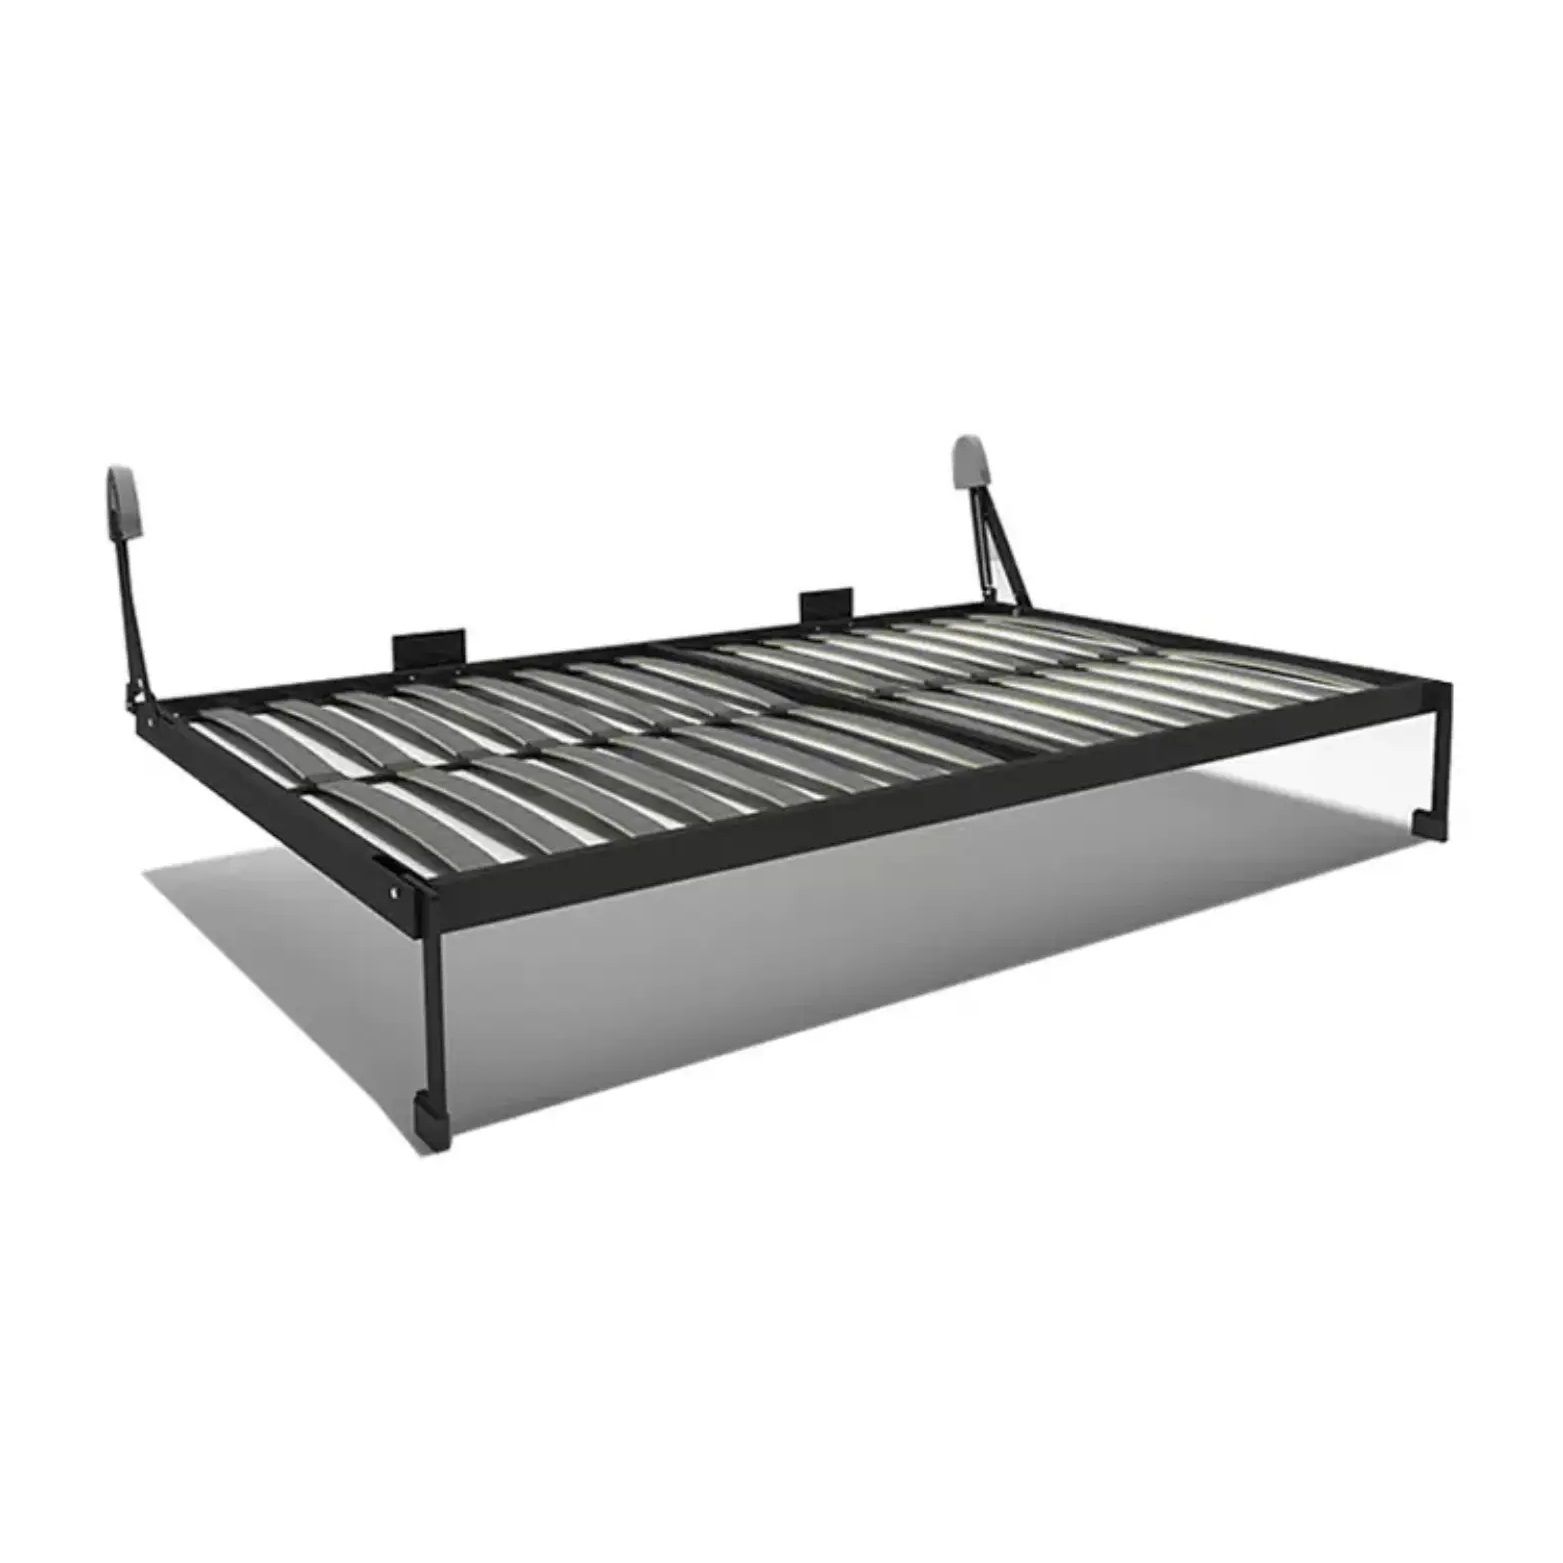
Looking to make the most of your living space with a space-saving queen bed? We've got you covered! Our company specializes in providing top-quality hardware components for Space Saving Queen Beds. Whether you're a furniture manufacturer or a DIY enthusiast, our range of products is designed to help you create efficient and stylish living spaces. In this article, we'll introduce you to the essential hardware components that make our Space Saving Queen Beds the perfect solution for optimizing your space.Mattress thickness max 250mm for standard hardware
Wall-Mounted Mechanisms: At the core of our Space Saving Queen Beds are our robust wall-mounted mechanisms. These sturdy components allow the bed frame to be securely attached to the wall, providing stability and safety. Our cutting-edge wall-mounting systems are engineered to support queen-sized beds, ensuring a reliable and durable solution for your space-saving needs.
Folding Mechanisms: The key feature of our Space Saving Queen Beds is the folding mechanism. This innovative hardware allows the bed frame to easily fold up and down, transforming your sleeping area into valuable floor space during the day. Our folding mechanisms are meticulously designed for smooth operation and long-lasting performance. With adjustable tension settings, you can customize the folding action to suit your specific preferences.
Gas Springs: To enhance the convenience and safety of our Space Saving Queen Beds, we incorporate high-quality gas springs into our designs. These gas springs assist in the smooth folding and unfolding of the bed frame, providing controlled movement and preventing sudden drops or collapses. Our gas springs are precisely calibrated to offer optimal support and effortless operation, ensuring a comfortable and secure sleeping experience.
Locking Mechanisms: Safety and stability are paramount, which is why our Space Saving Queen Beds feature reliable locking mechanisms. These mechanisms ensure that the bed frame remains securely in place when in use and prevent accidental folding or unfolding. We utilize premium materials and rigorous testing processes to guarantee the reliability and durability of our locking mechanisms, giving you peace of mind.
By incorporating our high-quality hardware components including wall-mounted mechanisms, folding mechanisms, gas springs, and locking mechanisms into your Space Saving Queen Bed designs, you can create a functional and stylish sleeping solution that optimizes your living space. Whether you're looking to maximize a small apartment or create a versatile guest room, our Space Saving Queen Beds are the ideal choice.Experience the convenience and versatility of our Space Saving Queen Bed hardware components today. Elevate your space, enhance your comfort, and enjoy the benefits of a well-designed, efficient living area.
Looking to make the most of your living space with a space-saving queen bed? We've got you covered! Our company specializes in providing top-quality hardware components for Space Saving Queen Beds. Whether you're a furniture manufacturer or a DIY enthusiast, our range of products is designed to help you create efficient and stylish living spaces. In this article, we'll introduce you to the essential hardware components that make our Space Saving Queen Beds the perfect solution for optimizing your space.
Mattress thickness max 250mm for standard hardware
Wall-Mounted Mechanisms: At the core of our Space Saving Queen Beds are our robust wall-mounted mechanisms. These sturdy components allow the bed frame to be securely attached to the wall, providing stability and safety. Our cutting-edge wall-mounting systems are engineered to support queen-sized beds, ensuring a reliable and durable solution for your space-saving needs.
Folding Mechanisms: The key feature of our Space Saving Queen Beds is the folding mechanism. This innovative hardware allows the bed frame to easily fold up and down, transforming your sleeping area into valuable floor space during the day. Our folding mechanisms are meticulously designed for smooth operation and long-lasting performance. With adjustable tension settings, you can customize the folding action to suit your specific preferences.
Gas Springs: To enhance the convenience and safety of our Space Saving Queen Beds, we incorporate high-quality gas springs into our designs. These gas springs assist in the smooth folding and unfolding of the bed frame, providing controlled movement and preventing sudden drops or collapses. Our gas springs are precisely calibrated to offer optimal support and effortless operation, ensuring a comfortable and secure sleeping experience.
Locking Mechanisms: Safety and stability are paramount, which is why our Space Saving Queen Beds feature reliable locking mechanisms. These mechanisms ensure that the bed frame remains securely in place when in use and prevent accidental folding or unfolding. We utilize premium materials and rigorous testing processes to guarantee the reliability and durability of our locking mechanisms, giving you peace of mind.
By incorporating our high-quality hardware components including wall-mounted mechanisms, folding mechanisms, gas springs, and locking mechanisms into your Space Saving Queen Bed designs, you can create a functional and stylish sleeping solution that optimizes your living space. Whether you're looking to maximize a small apartment or create a versatile guest room, our Space Saving Queen Beds are the ideal choice.
Experience the convenience and versatility of our Space Saving Queen Bed hardware components today. Elevate your space, enhance your comfort, and enjoy the benefits of a well-designed, efficient living area.
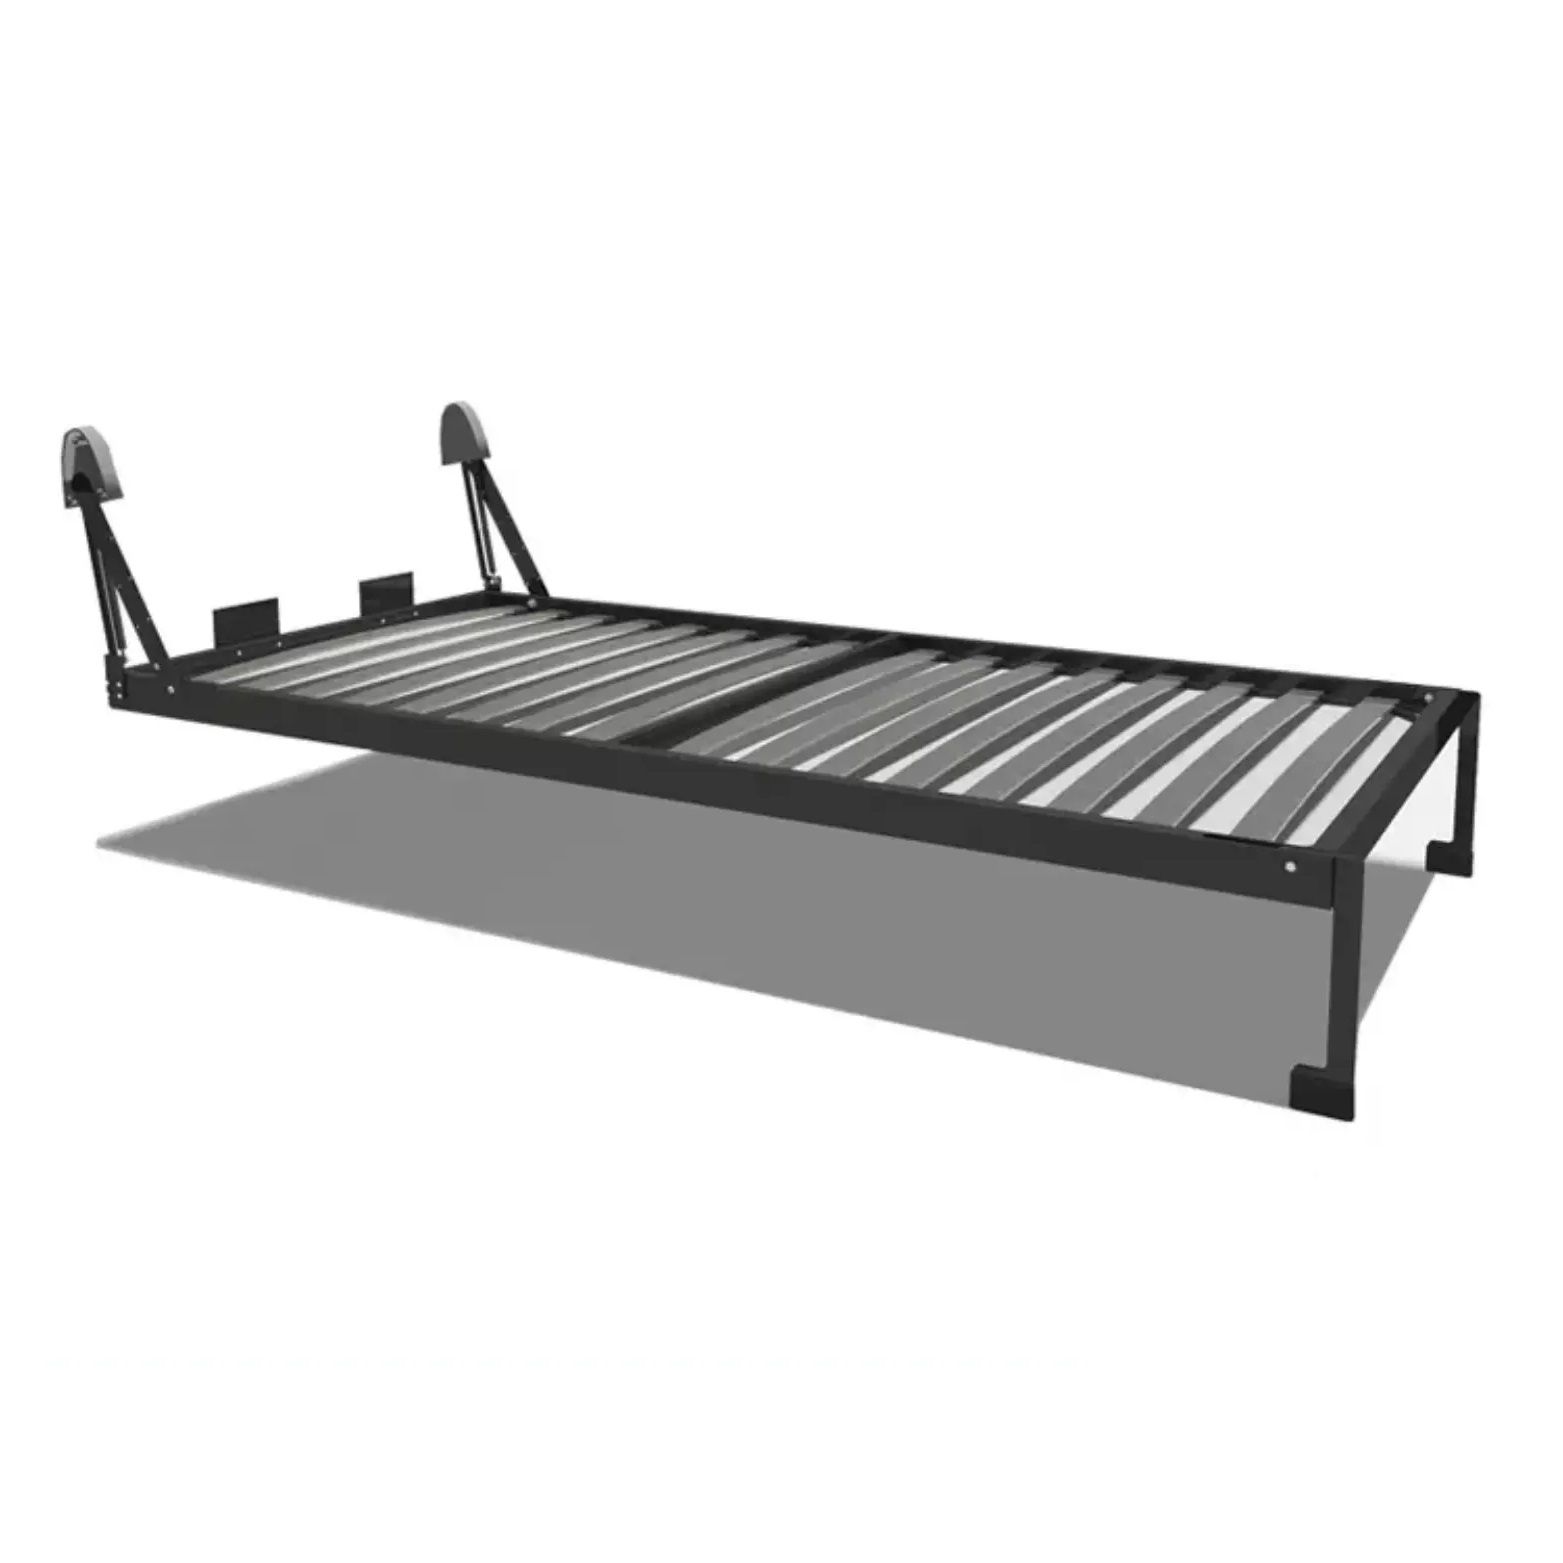
Are you in search of an innovative solution to maximize space in your bedroom? Look no further! Our company specializes in providing top-notch hardware components for Space Saving Super Single beds. Whether you're a furniture manufacturer or a DIY enthusiast, our range of products is designed to help you create efficient living spaces without compromising on comfort or style. In this article, we will introduce you to the essential hardware components that make our Space Saving Super Single beds a practical and versatile choice for any bedroom.Mattress thickness max 250mm for standard hardware
Wall-Mounted Mechanisms: At the core of our Space Saving Super Single beds are our reliable wall-mounted mechanisms. These sturdy components allow the bed frame to be securely attached to the wall, providing stability and safety. Our state-of-the-art wall-mounting systems are engineered to support Super Single bed sizes, ensuring a secure and durable solution for your space-saving needs.
Folding Mechanisms: The essence of our Space Saving Super Single beds lies in the folding mechanism. This ingenious hardware enables the bed frame to effortlessly fold up and down, allowing you to transform your sleeping area into usable floor space during the day. Our folding mechanisms are meticulously engineered to ensure smooth operation and long-lasting performance. With adjustable tension settings, you can customize the folding action to suit your preferences.
Gas Springs: To enhance the ease of use and safety of our Space Saving Super Single beds, we incorporate high-quality gas springs into our designs. These gas springs assist in the smooth folding and unfolding of the bed frame, providing controlled movement and preventing sudden drops or collapses. Our gas springs are carefully calibrated to offer optimal support and ease of operation, ensuring a seamless experience for users.
Locking Mechanisms: Safety is our utmost priority, which is why our Space Saving Super Single beds feature robust locking mechanisms. These mechanisms ensure that the bed frame remains securely in place when in use, preventing accidental folding or unfolding. We utilize high-quality materials and rigorous testing processes to guarantee the reliability and durability of our locking mechanisms, ensuring peace of mind for both manufacturers and end-users.
In conclusion, our Space Saving Super Single beds offer a smart and practical solution for maximizing space in any bedroom. With our range of high-quality hardware components, including wall-mounted mechanisms, folding mechanisms, gas springs, and locking mechanisms, you can create a versatile and efficient sleeping area without compromising on comfort or style. Explore our selection of hardware components today and revolutionize the way you utilize space in your bedroom.
Are you in search of an innovative solution to maximize space in your bedroom? Look no further! Our company specializes in providing top-notch hardware components for Space Saving Super Single beds. Whether you're a furniture manufacturer or a DIY enthusiast, our range of products is designed to help you create efficient living spaces without compromising on comfort or style. In this article, we will introduce you to the essential hardware components that make our Space Saving Super Single beds a practical and versatile choice for any bedroom.
Mattress thickness max 250mm for standard hardware
Wall-Mounted Mechanisms: At the core of our Space Saving Super Single beds are our reliable wall-mounted mechanisms. These sturdy components allow the bed frame to be securely attached to the wall, providing stability and safety. Our state-of-the-art wall-mounting systems are engineered to support Super Single bed sizes, ensuring a secure and durable solution for your space-saving needs.
Folding Mechanisms: The essence of our Space Saving Super Single beds lies in the folding mechanism. This ingenious hardware enables the bed frame to effortlessly fold up and down, allowing you to transform your sleeping area into usable floor space during the day. Our folding mechanisms are meticulously engineered to ensure smooth operation and long-lasting performance. With adjustable tension settings, you can customize the folding action to suit your preferences.
Gas Springs: To enhance the ease of use and safety of our Space Saving Super Single beds, we incorporate high-quality gas springs into our designs. These gas springs assist in the smooth folding and unfolding of the bed frame, providing controlled movement and preventing sudden drops or collapses. Our gas springs are carefully calibrated to offer optimal support and ease of operation, ensuring a seamless experience for users.
Locking Mechanisms: Safety is our utmost priority, which is why our Space Saving Super Single beds feature robust locking mechanisms. These mechanisms ensure that the bed frame remains securely in place when in use, preventing accidental folding or unfolding. We utilize high-quality materials and rigorous testing processes to guarantee the reliability and durability of our locking mechanisms, ensuring peace of mind for both manufacturers and end-users.
In conclusion, our Space Saving Super Single beds offer a smart and practical solution for maximizing space in any bedroom. With our range of high-quality hardware components, including wall-mounted mechanisms, folding mechanisms, gas springs, and locking mechanisms, you can create a versatile and efficient sleeping area without compromising on comfort or style. Explore our selection of hardware components today and revolutionize the way you utilize space in your bedroom.
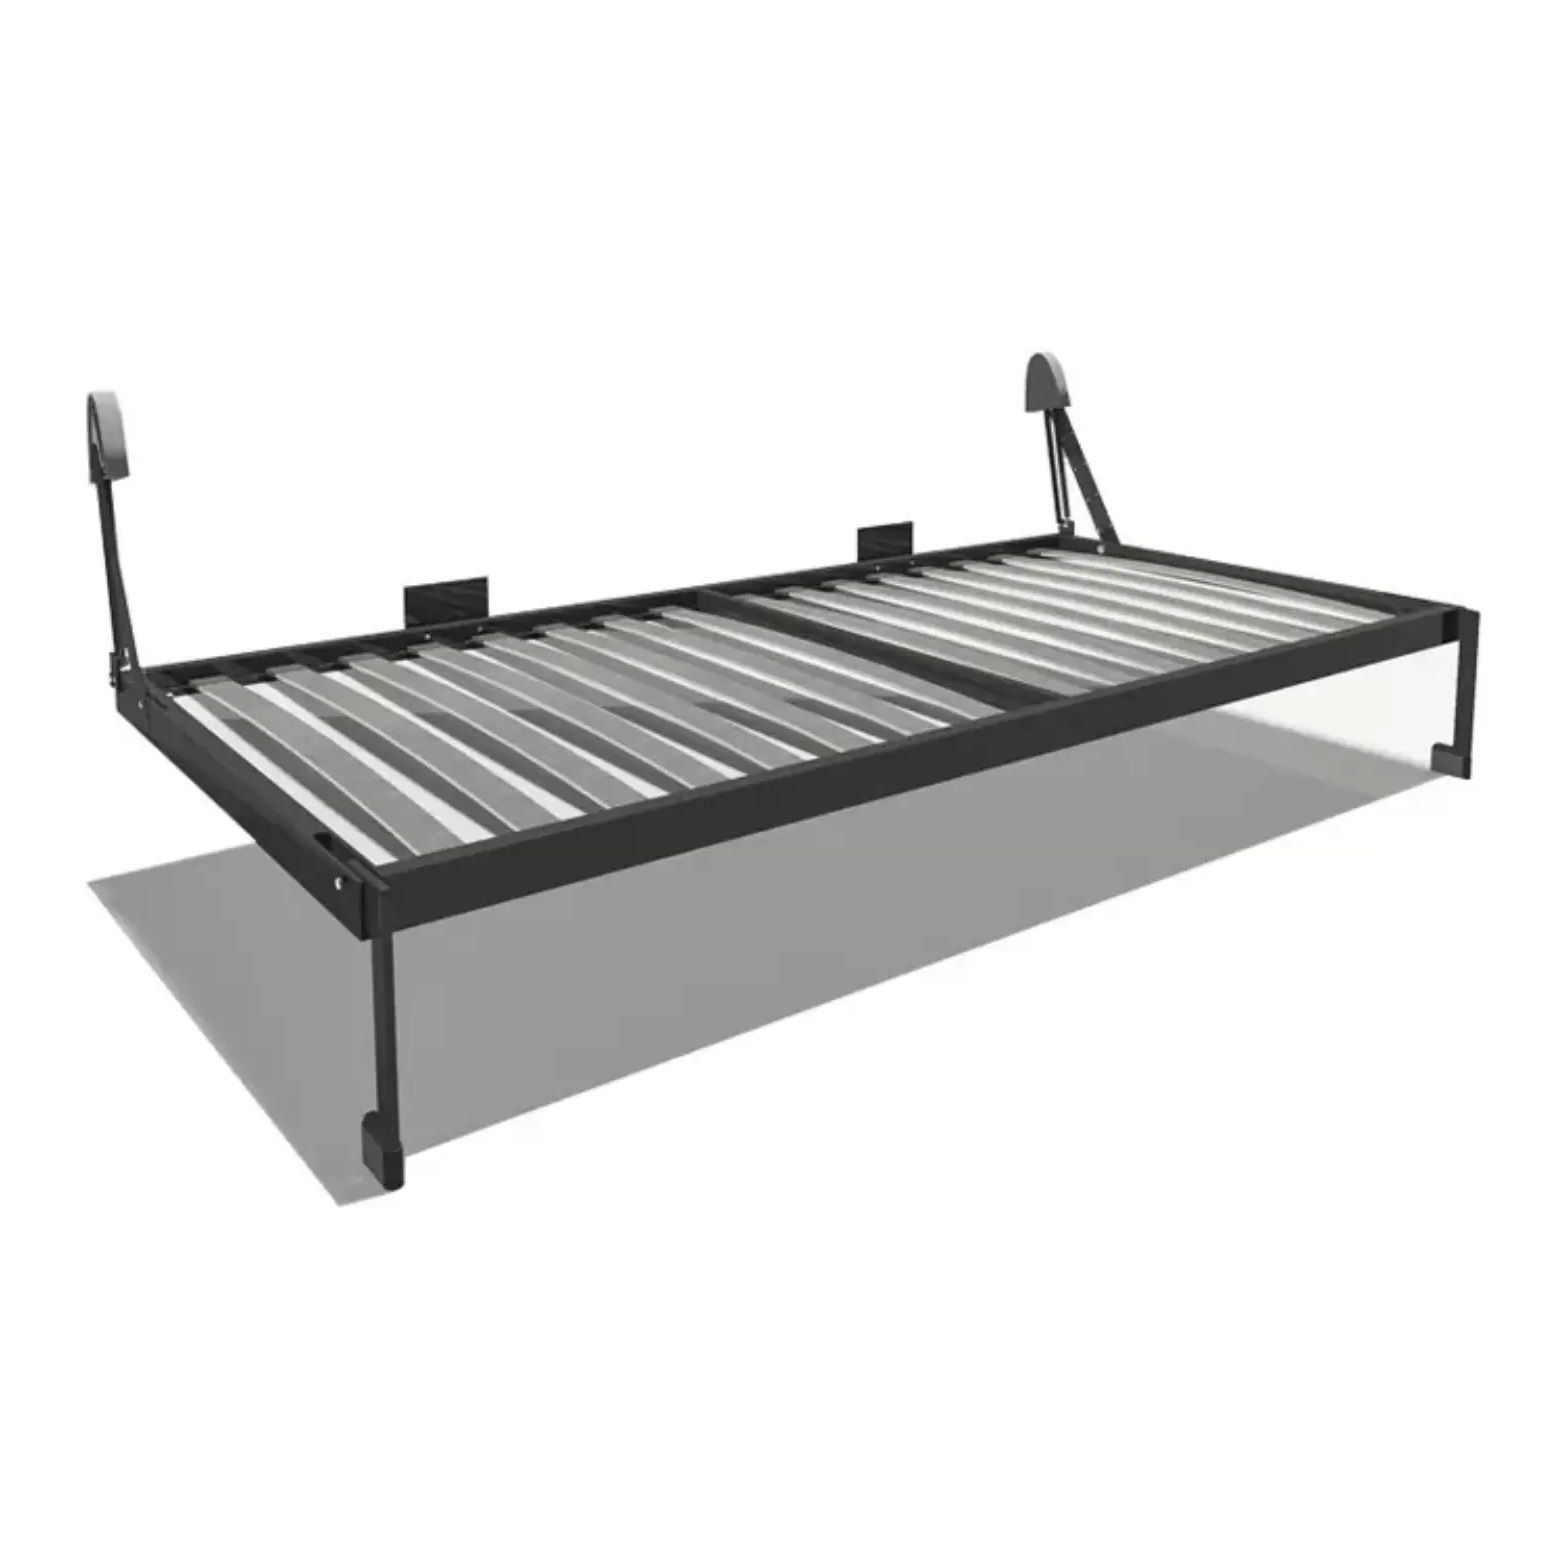
Are you looking to optimize space utilization in your home with innovative solutions? Look no further! Our company specializes in providing top-quality hardware components for Space Saving Single Beds. Whether you're a furniture manufacturer or a DIY enthusiast, our range of products is designed to help you create efficient living spaces without compromising on comfort or style. In this article, we will introduce you to the essential hardware components - Wall-Mounted Mechanisms, Folding Mechanisms, Gas Springs, and Locking Mechanisms - that make our Space Saving Single Beds a practical and versatile choice for any living environment.Mattress thickness max 250mm for standard hardware
Wall-Mounted Mechanisms: Our Space Saving Single Beds are built on the foundation of sturdy Wall-Mounted Mechanisms. These robust components allow the bed frame to be securely attached to the wall, ensuring stability and safety. Our state-of-the-art wall-mounting systems are engineered to support single bed sizes and weights, providing a reliable and durable solution.
Folding Mechanisms: At the heart of our Space Saving Single Beds lies the Folding Mechanism. This ingenious hardware enables the bed frame to effortlessly fold up and down, transforming the sleeping area into usable floor space during the day. Our Folding Mechanisms are meticulously engineered to ensure smooth operation and long-lasting performance. With adjustable tension settings, you can customize the folding action to suit your specific needs.
Gas Springs: To enhance ease of use and safety, we incorporate high-quality Gas Springs into our Space Saving Single Beds. These gas springs assist in the smooth folding and unfolding of the bed frame, providing controlled movement and preventing sudden drops or collapses. Our Gas Springs are carefully calibrated to offer optimal support and ease of operation.
Locking Mechanisms: Safety is of paramount importance to us, which is why our Space Saving Single Beds feature robust Locking Mechanisms. These mechanisms ensure that the bed frame remains securely in place when in use and prevent accidental folding or unfolding. We use high-quality materials and rigorous testing processes to guarantee the reliability and durability of our Locking Mechanisms.
In conclusion, our Space Saving Single Beds offer a smart and practical solution for maximizing space in any living environment. With our range of high-quality hardware components including Wall-Mounted Mechanisms, Folding Mechanisms, Gas Springs, and Locking Mechanisms, you can create versatile and efficient living spaces without compromising on comfort or style. Explore our selection of hardware components today and revolutionize the way you utilize space in your home.
Are you looking to optimize space utilization in your home with innovative solutions? Look no further! Our company specializes in providing top-quality hardware components for Space Saving Single Beds. Whether you're a furniture manufacturer or a DIY enthusiast, our range of products is designed to help you create efficient living spaces without compromising on comfort or style. In this article, we will introduce you to the essential hardware components - Wall-Mounted Mechanisms, Folding Mechanisms, Gas Springs, and Locking Mechanisms - that make our Space Saving Single Beds a practical and versatile choice for any living environment.
Mattress thickness max 250mm for standard hardware
Wall-Mounted Mechanisms: Our Space Saving Single Beds are built on the foundation of sturdy Wall-Mounted Mechanisms. These robust components allow the bed frame to be securely attached to the wall, ensuring stability and safety. Our state-of-the-art wall-mounting systems are engineered to support single bed sizes and weights, providing a reliable and durable solution.
Folding Mechanisms: At the heart of our Space Saving Single Beds lies the Folding Mechanism. This ingenious hardware enables the bed frame to effortlessly fold up and down, transforming the sleeping area into usable floor space during the day. Our Folding Mechanisms are meticulously engineered to ensure smooth operation and long-lasting performance. With adjustable tension settings, you can customize the folding action to suit your specific needs.
Gas Springs: To enhance ease of use and safety, we incorporate high-quality Gas Springs into our Space Saving Single Beds. These gas springs assist in the smooth folding and unfolding of the bed frame, providing controlled movement and preventing sudden drops or collapses. Our Gas Springs are carefully calibrated to offer optimal support and ease of operation.
Locking Mechanisms: Safety is of paramount importance to us, which is why our Space Saving Single Beds feature robust Locking Mechanisms. These mechanisms ensure that the bed frame remains securely in place when in use and prevent accidental folding or unfolding. We use high-quality materials and rigorous testing processes to guarantee the reliability and durability of our Locking Mechanisms.
In conclusion, our Space Saving Single Beds offer a smart and practical solution for maximizing space in any living environment. With our range of high-quality hardware components including Wall-Mounted Mechanisms, Folding Mechanisms, Gas Springs, and Locking Mechanisms, you can create versatile and efficient living spaces without compromising on comfort or style. Explore our selection of hardware components today and revolutionize the way you utilize space in your home.
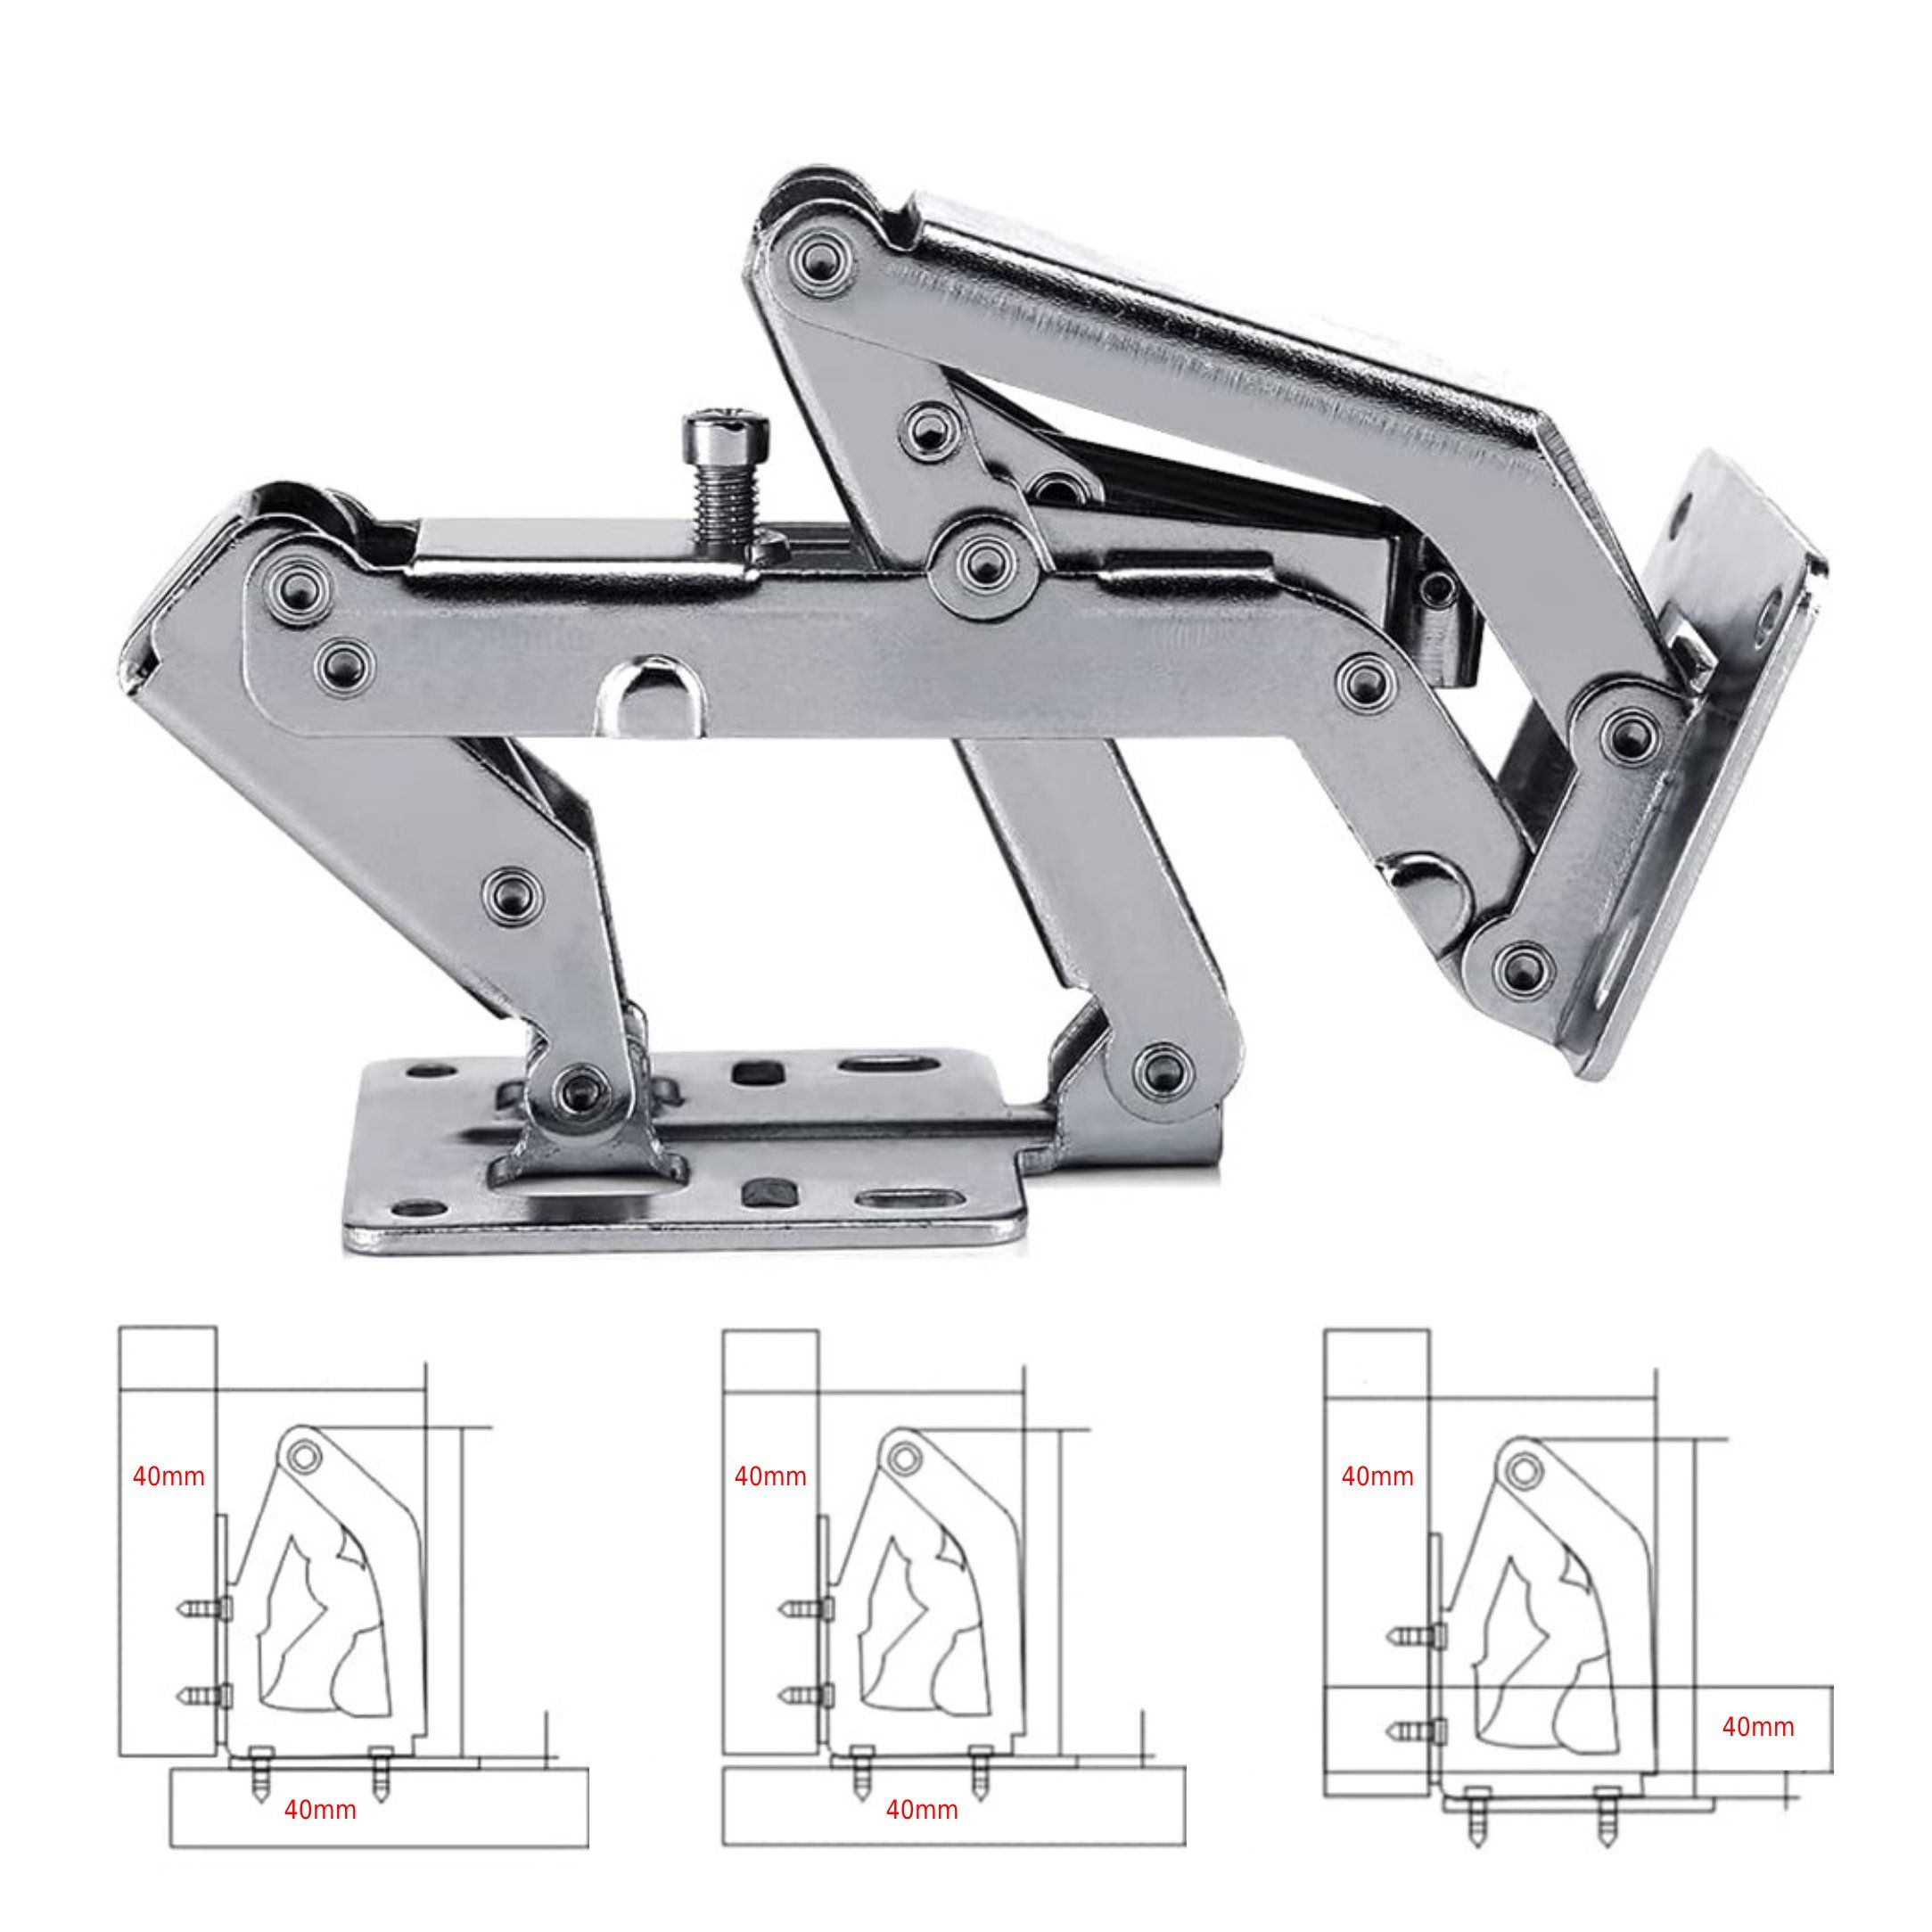
170 degree fixing clip for soft closing hinges of kitchen cabinets Easy to adjust-you can move the door panel to 5mm by adjusting the screw and then use a frameless door clamp to close it gently-not for built-in doors
3 This hydraulic hinge is ideal for closing the cabinet slowly and slowly High-strength carbon steel hinge has good anti-rust function and strong load-bearing capacity Suitable for doors with door thickness of 16mm to 40mm, the opening angle can be adjusted to 130-170 degrees by adjusting screws
4 Can be placed not only in the bedroom wardrobe, but also in the toilet, kitchen or other places with cabinets
5 Surface treatment: nickel-plated, silver appearance, suitable for most styles of doors
Hello 👋 Feel free to ask anything about your home design and renovation. Please use contact us page to leave your details. If you have question can WhatsApp us to ask more.